Winterizing Your Irrigation System
Winterizing is the process of preparing a plumbing system for freezing temperatures to prevent damage. The process of winterizing an irrigation system involves turning off the controller, shutting off the water supply, draining or blowing out all of the water in the system, and insulating exposed components. The order of that process may change depending on where you live and what system you have.
The general rule of thumb is to keep your irrigation system winterized between November and February. In actuality, it depends on where you live. You should winterize your system before the first freeze and keep it winterized until after the last. Consider turning it back on in March or April, keeping in mind that grass typically only needs up to 1″ of water per week. If temperatures are mild and there’s adequate precipitation, you won’t need to pay to water your yard.
Why is it important?
Well, there’s more to it than saving you time and money; it could also prevent damage to your house. It can cost thousands of dollars to have a licensed irrigator repair a home irrigation system or hundreds of dollars for you to do the repairs yourself. Doing them yourself introduces the risk of not finding and fixing all of the damaged components. If you operate the system normally when there is damage, leaks can oversaturate the soil, foundation, and siding, causing very expensive damage to the house.
- Oversaturating the grass can cause it to die and puddles may attract disease-carrying insects.
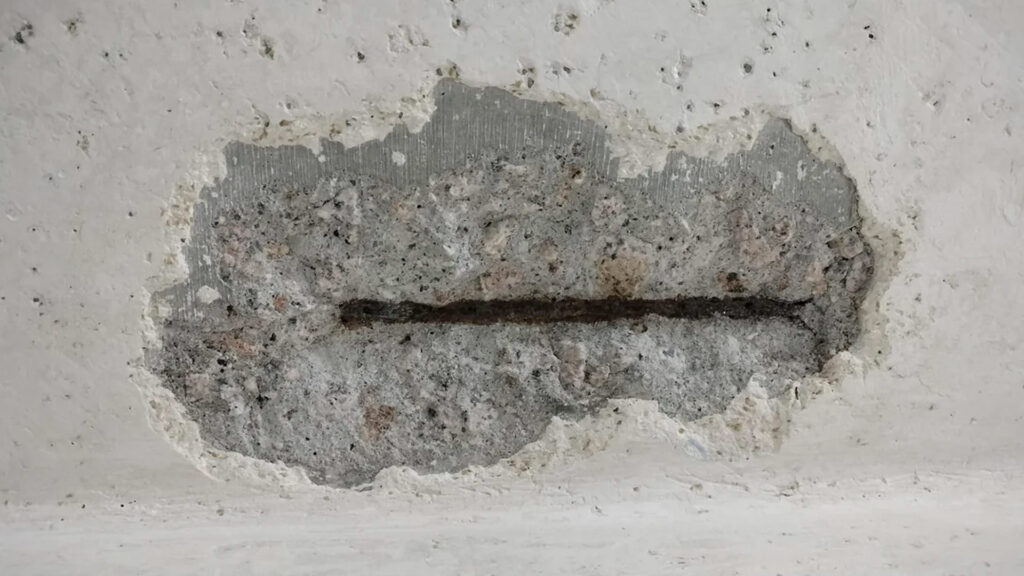
- Oversaturation the soil under the foundation can cause differential settlement of the foundation.
- Oversaturating the foundation of a house can cause spalling and cracks to form in your foundation.
- Oversaturating masonry siding can cause damaging efflorescence to build up on the siding.
How to winterize your system
There are two methods of winterizing your irrigation system: drain and blowout. The method you will use is determined by your located and type of system. The drain method is used in warmer climates, where freezing is rare. The blowout method is used in cooler climates, where freezing is likely and the frost level is below 6-8 inches.
You need to know the location of:
Irrigation Water Shut-off Valve
These valves are required in all new irrigation systems, since 2009. It should be located in a valve box in the ground, between the water meter and the backflow preventer, or in the garage or basement. These can be ball valves or gate valves.
Drain Valve (if present)
These are not required and may not be present on your system. They are common on systems with in-ground backflow preventers. It should be located right beside the irrigation water shut-off valve. These can be ball valves or gate valves.
Backflow Preventer
These are required by code for your safety in all irrigation systems, since 1996. They are typically located on the side of the house our in a garden, but in some cases are in the middle of the yard. These are discussed in the next section.
Blowout Valve (if present)
These are not required and may not be present on your system. They are located after the backflow preventer, because blowing air through a backflow preventer can significantly damage it.
(Expand to learn more)
The goal of the drain method is to drain the pressurized water from the lines and backflow preventer, and leave a way for the remaining water to expand without damaging the system. Any homeowner can do it.
The goal of the blowout method is to blow out the majority of the water from the lines, the heads, and the backflow preventer, and to leave a way for the remaining water to expand without damaging the system. I recommend having a licensed irrigator perform this method, because improper PSI or CFM could melt seals and damage other components.
What is a Backflow Preventer?
For safety, a backflow preventer has been required by code on every irrigation system, since 1996, regardless of if it was originally installed or not. These are required because they prevent contaminated water from flowing back into the clean/potable water system of the house. It’s not just your house that could be affected, but every house in the area. Know which type of backflow preventer you have will help you understand where your test cocks and isolation valves are located.
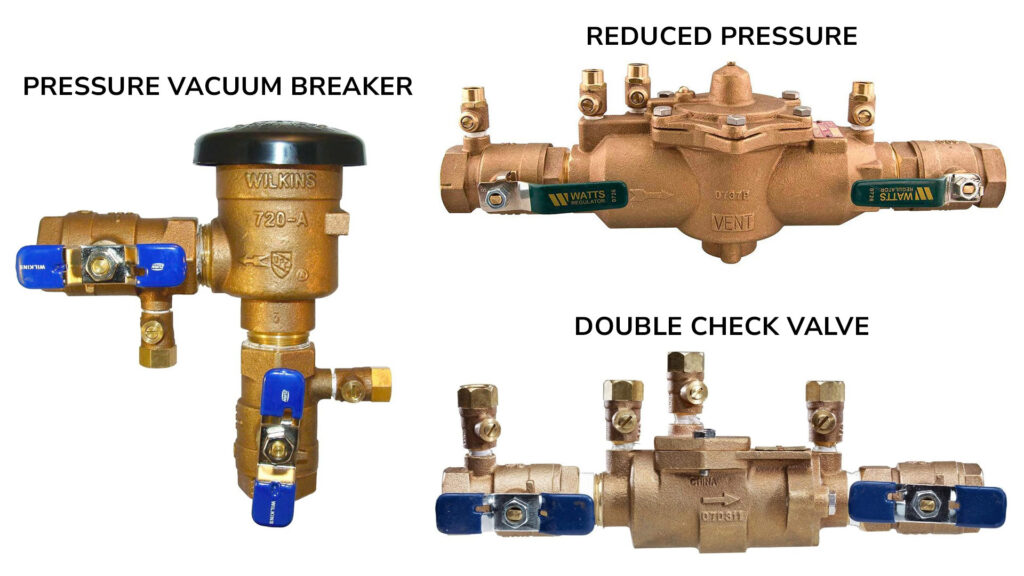
There are three main types of backflow preventers:
Pressure Vacuum Breaker
These are the most common backflow preventers and are used in warmer Texas climates. They are typically located on the side of the house. If not damaged due to freezing, they have a 5-10 year life expectancy.
Reduced Pressure
These are the most common backflow preventers used in cooler Texas climates. They are typically located on the side of the house. If not damaged due to freezing, they have a 10-15 year life expectancy.
Double Check Valve
These are more expensive than pressure vacuum breakers and not as easy to work on as either, so they are less commonly used. They are beneficial, when you want to hide your backflow preventer. They are typically located in the ground, in a valve box; it may look like a water meter box. If not damaged due to freezing, they have a 5-10 year life expectancy.
(Expand to learn more)
Drain Method
- Shut Down the Irrigation Controller
- The controller for the irrigation system is typically located in the garage, utility room, or basement. Turn it into the “off” position to prevent it from activating during the winter. Smart devices can be turned off using the app on your phone.
- Shut Off the Water at the Isolation Valve
- The water shut-off valve, also known as the isolation valve for the irrigation system, is typically located in a valve box in the yard, between the water meter and the backflow preventer. To close the valve, turn it clockwise until it stops. This will be a few full rotations for gate valves and only a 90° turn for ball valves.
- Drain System at Backflow Preventer
- You will need to go to your backflow preventer and locate the test cocks which might have black caps on their ends. Test cocks are ball valves that are adjusted with a flathead screwdriver. Ball valves only need to be turned 90° to either fully open or fully close the valve. Remove any caps and slowly open all of the test cocks by turning them counterclockwise to begin draining water from the system. After the water stops dripping, partially close the test cocks to 45° with the flathead. Also, partially close the isolation valves at the inlet and outlet of the backflow preventer by turning the handle 45°. This ensures any water in the system will have a way to expand without breaking any component.
- If you have a reduced pressure backflow preventer, as you drain the system from the test cocks, water will also drain from the air gap vent located at the bottom of the unit.
- NOTE – Many people think that turning off the water at the isolation valve at the inlet of the backflow preventer is proper procedure. However, this traps water in the line between the meter and the backflow preventer, and it also traps water in the isolation ball valve itself. These pipes and valves are more susceptible to freeze damage.
- NOTE – If your system doesn’t have an isolation valve, you can turn water off at the backflow preventer temporarily, but be sure to add extra insulation around the valve. You’ll also need to add an isolation valve in the ground as soon as possible.
- Check Insulation
- Wrap all above-ground water pipes with pipe insulation and secure the insulation with pipe wrap tape to ensure proper protection. It is also recommended to cover the isolation valves with insulation and pipe wrap tape.
- Cover the above-ground backflow preventer with an insulated bag cover. I recommend this insulated cover, because it is from a well-known TX company that is well-rated, it protects down to 5° weather, there is a variety of options, and they have a 30-day return policy.
- At this time, it’s also a good idea to verify that no other exterior plumbing pipes need insulation and to cover your hose bibs.
Blowout Method
- Shut Off the Water at the Isolation Valve
- In cool climates, the water shut-off valve, also known as the isolation valve for the irrigation system, is located either in a basement or utility room, or in a valve box in the yard, between the water meter and the backflow preventer. To close the valve, turn it clockwise until it stops. This will be a few full rotations for gate valves and only a 90° turn for ball valves.
- Isolate Backflow
- Backflow preventers (the reduced pressure type is common in cooler climates) can be damaged by pressurized air, so it’s important to isolate the backflow preventer. Turn the isolation valve at the outlet of the backflow preventer clockwise 90°, until it’s closed.
- Blowout the System
- The blowout cap should be located immediately after the backflow preventer. Slowly remove it, because it will be under pressure. Then connect the compressor adapter and hose.
- At the controller, run the system starting with zone 1.
- Turn the compressor on. Set the airflow to between 20 and 50 CFM. Ideally, you should aim for 50 CFM for optimal performance. Then adjust the pressure to within the range of 40 to 80 PSI (80 is the max for PVC and 50 is the max for polyethylene).
- Blow out each zone until all of the heads in it are misting constantly.
- Turn off compressor, disconnect the hose, and replace the blowout cap.
- Drain Backflow Preventer & Supply Lines
- Partially open all of the test cocks on the backflow preventer, by turning them 45°. Partially open all of the isolation valves on the backflow preventer by turning the handles 45°.
- Locate the supply line drain valve, which is typically next to the irrigation water shut-off valve in the basement, utility room, or in the ground. Open the valve fully to drain the supply line between the water shut-off valve and the backflow preventer. If this is not connected to a drain line, you may need to catch the water in a bucket.
- Shut off Controller and Check Insulation
- The controller for the irrigation system is typically located in the garage, utility room, or basement. Turn it into the “off” position to prevent it from activating during the winter. Smart devices can be turned off using the app on your phone.
- Wrap all above-ground water pipes with pipe insulation and secure the insulation with pipe wrap tape to ensure proper protection. It is also recommended to cover the isolations valves with insulation and pipe wrap tape.
- Cover the above-ground backflow preventer with an insulated bag cover. I recommend this insulated cover, because it is from a well-known TX company that is well-rated, it protects down to 5° weather, there is a variety of options, and they have a 30-day return policy.
- At this time, it’s also a good idea to verify that no other exterior plumbing pipes need insulation and to cover your hose bibs.
Turning your system back on
To turn you system back on, you might want to simply reverse the winterizing process, but actually the process is quite different, because there are several other factors to consider. For instance, reintroducing water to the system a a controlled rate, rather than just turning everything fully on immediately, will prevent damage to components. Regardless of which method you used to winterize your system, these are the proper steps to turn it back on.
- Prepare the System
- Close all isolation valves and test cocks at the backflow preventer.
- If a blowout cap is present on your system, make sure it’s screwed in all the way.
- Slowly Reintroduce Water
- Slowly open the irrigation isolation valve.
- Slowly turn the handle for the backflow preventer’s inlet (upstream) isolation valve counterclockwise to open the valve and reintroduce water to the backflow preventer.
- Slowly turn the handle for the backflow preventer’s outlet (downstream) isolation valve counterclockwise to open the valve and reintroduce water to the rest of the system.
- Check for leaks
- At this point, water is in the supply lines running from the irrigation isolation valve to the each of the zone controllers. If your system has 4 zones, that means that 5 main supply lines that are full of water. If they are damaged, you should see water begin to pool on the ground.
- Run the System
- Replace the battery in your controller and turn it on.
- Verify that your rain sensor is vertical, securely fastened, and not covered with debris.
- Run your system, checking each zone for broken heads, incorrect spray, and leaks.
- Heads should be level with the ground when not activated, and rise above the grass or foliage when activated.
- Heads spraying the house may cause oversaturation of masonry siding and concrete foundation, and may cause wooden siding to rot.
I hope you found this guide informative and easy to understand. There are new guides every week, so browse through
our guides page to see if any others might be helpful to you. Please, share this resource with your family and friends. We create these guides and provide expert home, commercial, and draw inspections in the Waco area in order to help everyone make informed decisions.